5 Steps for Installing Carpets To Achieve a Smooth Finish
Get a professional and smooth finish by following these steps for flawless carpet installation that transforms rooms without the typical frustrations.
Carpet installation demands more than a quick roll-and-go approach; it calls for precision, preparation, and a clear plan. Homeowners often focus on color and softness, but even the most luxurious carpet can ripple, fray, or wear unevenly without proper installation technique.
By following the right sequence of steps and applying care to every layer beneath the surface, you can achieve a sleek result that lasts. A smooth finish starts long before the carpet is even laid in place, and that’s where technique makes all the difference in the final result.
Step 1: Prepare the Subfloor Surface
Subfloor prep forms the foundation of every smooth, long-lasting carpet installation, and it requires more than a quick broom sweep. Begin by walking the entire room to detect dips, loose floorboards, or leftover adhesive from previous flooring. Even small imperfections under the surface eventually telegraph through carpet fibers, so use a belt sander or leveling compound to even out irregular areas without delay.
Moisture problems beneath the carpet often trigger mildew, stretching, or permanent odor issues that go undetected until damage appears. Use a reliable moisture meter to test at-risk locations like exterior corners, below windows, or near bathrooms and kitchens. If readings exceed safe limits, bring in a dehumidifier for several days and repair any leaks before moving forward.
A shop vacuum with a crevice tool reaches deeper than a standard vacuum, especially around tack strip edges or HVAC vents where dirt settles and compromises adhesion. After cleaning, inspect the floor again and repair nail pops, raised seams, or cracks using wood filler and a sanding block.
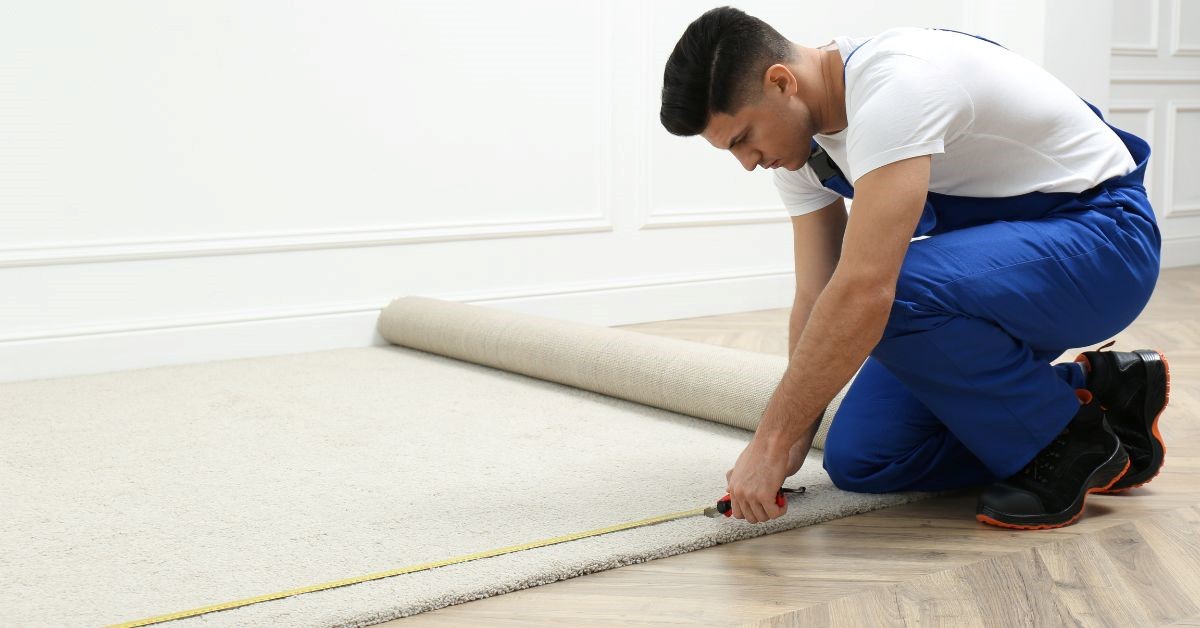
Step 2: Accurately Measure and Cut the Carpet
Precision during the measuring stage prevents oversized cuts, wasted material, or seams placed in high-traffic areas that accelerate wear. Start by sketching a basic room diagram, marking all wall lengths, doorway widths, and obstacles like vents or built-in cabinets. Include closet depths, angled corners, and thresholds to calculate total carpet square footage with enough overage for trimming and alignment.
Use a chalk line and metal straight edge to mark the back of the carpet, avoiding common mistakes caused by eyeballing cuts or following wall curves. Always cut from the back using a new utility blade to prevent fraying and replace the blade after every major section for clean lines. When cutting around vents, notch corners diagonally first, then trim in short strokes for precision without overcutting the hole.
Irregular room shapes like bay windows or angled hallways require more than rough cuts; they need flexible layout planning. Instead of forcing one continuous carpet roll, break the room into logical zones and plan seam placement near natural breaks such as doorways or furniture lines. This technique simplifies trimming and creates a more balanced finished look across large spaces.
At iDeal Floors, we know how overwhelming it feels to match design dreams with technical requirements, especially when carpet choices seem endless. We help you find the perfect carpet for sale that fits your lifestyle and matches your goals for color, softness, and durability. Whether you want bold patterns, neutral tones, or performance materials, we’ll guide you through options that feel comfortable underfoot and look exceptional for many years.
Step 3: Install Tack Strips and Padding
Tack strip installation requires careful spacing and precise placement to hold tension without damaging walls or baseboards. Leave a gap that’s roughly the width of the carpet between the strip and the wall. This provides enough room for tucking edges later on. Place the strip with the angled pins pointing toward the wall and secure it using masonry or wood nails depending on your subfloor type.
High-quality padding reduces pressure on carpet fibers, absorbs impact from daily foot traffic, and supports smoother stretching. Lay padding perpendicular to the carpet roll direction and avoid overlapping edges; this could cause bumps and irregularities across the finished floor. Use padding tape to seal seams and a staple gun or glue along edges to lock padding in place, particularly near transitions or doorways.
Not all rooms benefit from the same padding thickness or density, so match product specs with room usage. For basements or damp areas, select padding with moisture barriers to prevent mold development and carpet saturation. In formal rooms or stairwells, firmer padding helps maintain crisp carpet lines and consistent elevation between steps or levels.
Step 4: Place and Stretch the Carpet

Start placement by centering the carpet in the room with edges overlapping walls by several inches to allow for trimming. Fold back one half and apply seam tape or adhesive, depending on the carpet backing type, then press the carpet into place with a carpet roller to activate bonding. Complete the same process on the opposite side and smooth out any bubbles using a roller or carpet brush.
Use a knee kicker along short wall sections to attach the carpet to tack strips. Work in small segments to maintain even tension. For large rooms, a power stretcher extends across the space to apply consistent pressure and remove ripples or sags, preventing permanent defects. Always stretch the carpet from the center outwards to prevent corner bunching or diagonal wrinkles.
Mastering stretch technique plays a big role in achieving flawless results, especially when you’re trying to avoid visible seams and surface movement. Power carpet stretching equipment is an important tool to help complete the job properly. Following proper tension alignment is one vital step for installing carpets to achieve a smooth finish, particularly in large or oddly shaped rooms. Bold lines, crisp edges, and ripple-free surfaces depend entirely on executing this part with care and attention.
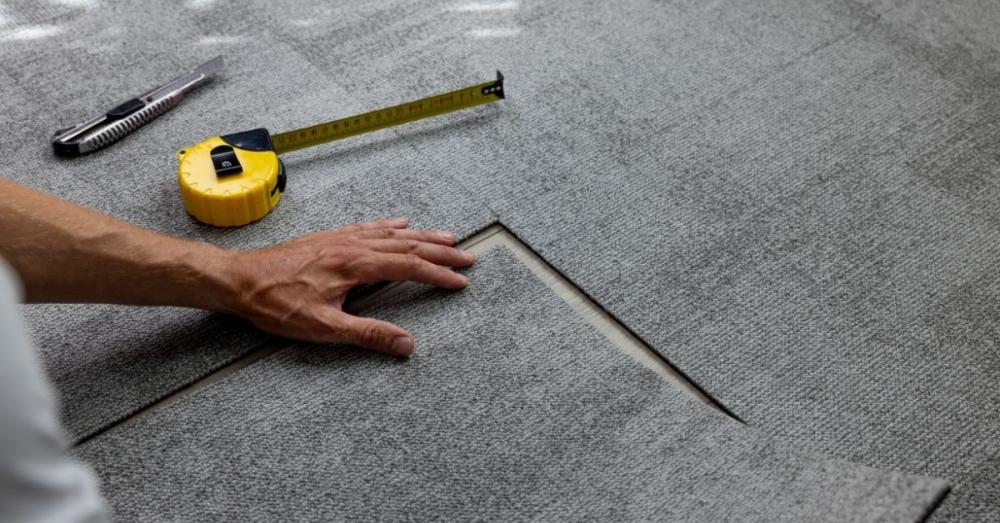
Step 5: Seam Joining and Carpet Edging
Line up adjacent carpet pieces by trimming both edges with a straightedge to create clean, parallel seams. Place seam tape under the cut edges, heat it with a seaming iron, and slowly press both edges into place with a carpet roller for maximum hold. Wait several minutes for the adhesive to cool before applying weight or stretching nearby sections to avoid disturbing the bond.
Blend patterns or textures at seams by carefully matching nap direction and fiber orientation before making final cuts. If you spot fraying, use seam sealant along the edges before pressing them together to prevent unraveling over time. Proper joining techniques enhance appearance and improve longevity, especially in high-traffic areas like hallways and family rooms.
Edge finishing plays a vital role in carpet longevity and visual impact. Trim excess carpet around doorways using a stair tool and tuck edges between tack strips and walls using steady, downward pressure. Install transition strips at thresholds where carpet meets tile, wood, or laminate to create a safe and polished finish.
Every installer must master seamless transitions because they impact how natural the room feels when you walk from one surface to another. One of the most important steps for installing carpets to achieve a smooth finish is to align the seams and doorways properly.
Precision and patience define every successful carpet installation from prep to final vacuum pass. For help choosing the right materials or upgrading additional rooms, visit iDeal Floors and let our team guide you through every step of your flooring project.
About the Author

Comments